
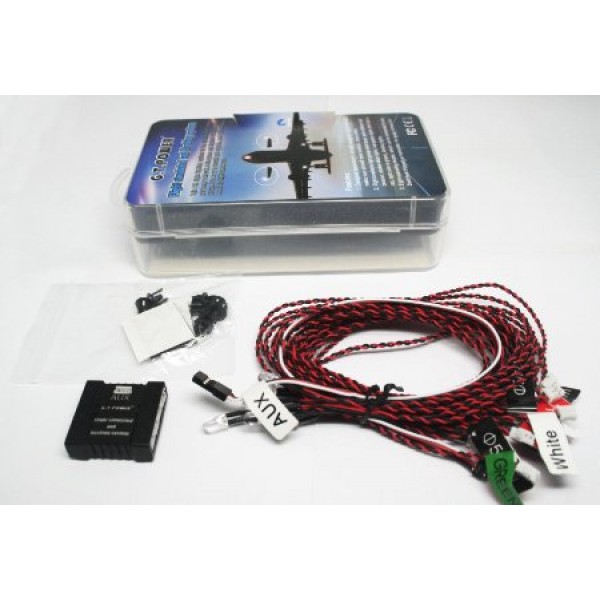
GT Power Aircraft Navigation Lighting System
Description: GT Power Aircraft Navigation Lighting SystemThis lighting set is a step up from the GT Power Aircraft Lighting System and ontains a control board that simulates actual aircraft navigation lighting. The system has been designed according to real aircraft navigation lighting standards featuring beacon, navigation and strobe lights to make your aircraft look more realistic. A great way to add a level of scale realism to your models and it is extremely easy to install. Using long life, super-bright (3 & 5mm diameter) LEDs, you will not have any trouble seeing any model they are installed in! All LEDs or LED combinations have separate plugs so they can be moved around for different lighting combinations. The system can be powered from your receiver or a separate power source and is suitable for any mid-size airplane (up to .60 size) or helicopter. The kit consists of eight bright LED lights, a control board with power lead, and clamps for securing the LEDs to the fuselage and wings of your aircraft, as well as double-sided tape for securing the control board within the fuselage. The included lights and patterns are as follows:
The control board power lead features a male JR plug for connection to any open channel on the receiver. We suggest using a UBEC or receiver battery pack to provide adequate power to these lights, as the standard linear mode BEC on most ESCs may become overloaded. Another option is to use an ESC that has a switch-mode BEC. FEATURES:
SPECIFICATIONS:
|


RCEXL Universal On Board Glow System Methanol Engine Ignition With LED Indicator
| RCEXL Universal On Board Glow System Methanol Engine Ignition With LED Indicator Fuel clunks are a must for aerobatic flying. It insures that fuel is always flowing to the engine because the fuel line will follow gravity inside your tank. Without one, you increase the chance that your plane may stall when flying inverted or performing different maneuvers. Installing a fuel clunk is simple to install and an investment that any serious pilot should make. 13x16mm .4 oz |
Rcexl-Glow-igniter-2214
$21.99
")
Miracle 19mm V4 Standard Heavy Duty Servo Arm-Half (Futaba/Hitec/JR)
| Miracle 19mm V4 Standard Heavy Duty Servo Arm-Half (Futaba/Hitec/JR) |
MRC-F-028-Servo-Half-Arm
$10.99
 MICROBRICK WITH 2 ON-BOARD SERVOS and MOLEX 2.00MM CONNECTOR PACKAGE")
Lemon RX DSMP (DSMX/DSM2 COMPATIBLE) MICROBRICK WITH 2 ON-BOARD SERVOS and MOLEX 2.00MM CONNECTOR PACKAGE
| Lemon RX DSMP (DSMX/DSM2 COMPATIBLE) MICROBRICK WITH 2 ON-BOARD SERVOS and MOLEX 1.25MM CONNECTOR PACKAGE
Description: Lemon Rx DSMX Compatible 6-Channel Receiver + Lemon DSMX Compatible Satellite
Highlight
Setup Instruction Binding
Setting Failsafe
|

LM-0070M2
$48.00