Lemon RX DSMP 10-CH TELEMETRY STABILIZER & T-PLUG ENERGY METER (DSMX/DSM2 COMPATIBLE)

Contact UsCustomer Reviews

Lemon RX DSMP 10-CH TELEMETRY STABILIZER & T-PLUG ENERGY METER (DSMX/DSM2 COMPATIBLE)

Our Price:

$62.80


Quantity (5)

Availability 5 in stock
Weight 0.25 lbs
SKU LM-0087T

Lemon RX DSMP 10-CH TELEMETRY STABILIZER & T-PLUG ENERGY METER (DSMX/DSM2 COMPATIBLE)

Product Specifications

Weight and Dimension: 16.3 grams, 66mm x 15mm x 24mm
Recommended voltage range: 3.9V to 8.5V (2S LiPo capable)
Telemetry Option: Integrated with Barometer with Vario, Altimeter, Energy meter (Requires V/I sensor) and Internal Temperature Sensor
Technology: DSMP with GEN2 SDR stack (DSMX / DSM2 compatibility)

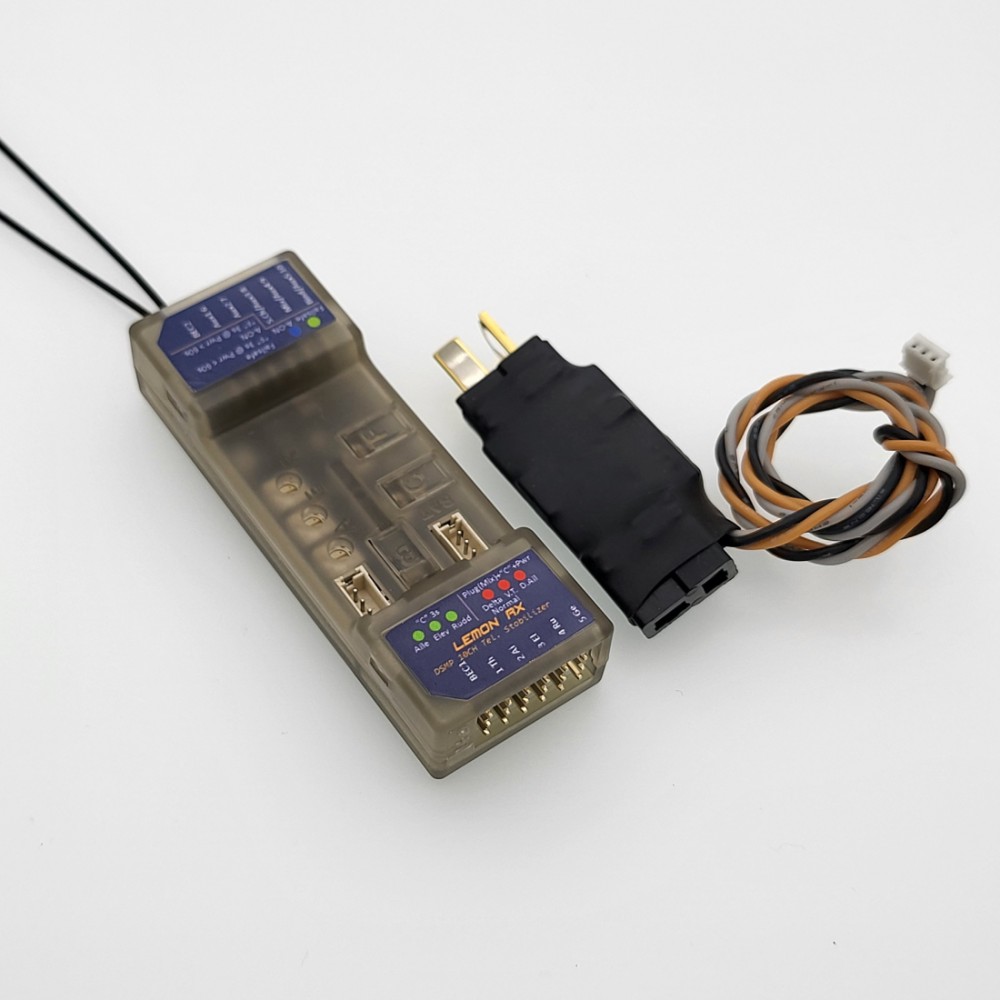
Highlight

The generation 2 DSMP 10-channel telemetry stabilizer is a complete redesign that provides the ultimate reliability, features and performance.

  • Choices of voltage and current sensors with exceptional capability
  •       - XT60 / T-Plug: 5S LiPo (21V max), 60A max.
  •       - Voltage Probe: 45V max.
  • DSMX / DSM2 compatible, 7-channel full-range telemetry stabilizer with full telemetry features including a built-in barometer with vario, altimeter, energy meter (Current, Voltage, mAh),  and internal temperature sensor
  • High sensitivity gyro with proprietary stabilization algorithm ensures responsive airplane control for both electric and gasoline engine application
  • BEC1 and BEC2 dual inputs allow high-reliability operation while improving setup for high current drain performance servo
  • Built-in Detla, V-tail and Normal Wing mixer
  • Supports stabilization with separated channel dual aileron operation
  • Stabilization always-on feature
  • Real-time variable stabilization gain control on channel 8
  • All-channel failsafe
  • Firmware health monitoring software stack and ultra-low operational voltage (3.6V) ensure the highest hardware reliability
  • Generation 2 SDR stack ensures the fastest channel searching and advanced algorithm for signal recovery with ultra-low-latency experience
  • Antenna diversity improves the reliability of the wireless link 
  • Satellite port for additional signal diversity
  • Gyro stabilization activation with either AUX2 or Gear channel
  • 3 potentiometers for individual gain tuning

User manual

- See www.lemon-rx.com/manual

Quick Reference Guide

Reset stabilizer

  • Connect power
  • Hold F and B buttons (approximately 5 secs+) until all LED flashes randomly
  • Press the C button. Multiple LEDs flash a few times to complete the operation

Bind with bind plug

  • Insert bind plug on Channel 7
  • Connect power

Bind without bind plug

  • Connect power
  • Hold the B button until the red LED flashes

Bind with a satellite without a bind plug

  • Connect power
  • Hold the B button until the red LED flashes
  • Disconnect power
  • Plug the satellite wire connector into the stabilizer
  • Connect power

Failsafe

  • Connect power to the receiver and ensure the servos are working with the transmitter
  • Press the F button for 3 seconds until green changes from off to on and vice versa to change the failsafe setting. Channel value is saved as failsafe default at the time the green LED turns on. 
  • Turn off the transmitter and wait 2 seconds to ensure the failsafe is activated accordingly by ensuring there is torque generated with finger-pushing the servo linkage if it was to be set. Vice versa.

Stabilization activation switch

  • Disconnect power
  • Insert bind plug to channel 5
  • Hold the C button
  • Connect power. Wait for about 1 second until the 6 LEDs flash.
  • Release the C button
  • Press C to make changes within 3 seconds. Green = CH7, Blue = CH5.
  • Wait for 3 seconds and remove the bind plug

Wing Mode and Dual Aileron

  • Disconnect power
  • Insert bind plug to channel 6
  • Hold the C button
  • Connect power. Wait for about 1 second until the 6 LEDs flash
  • Check the receiver label/user manual to understand the referred LEDs' operation 
  • Release the C button
  • Observe which red LED is flashing and brief press C to select the required mode
  • Press C to toggle between settings. On means selected. Exit automatically in 5 seconds.
  • Wait for 3 seconds and remove the bind plug
  • Ensure transmitter mixing is set accordingly for dual aileron if stabilized dual aileron is to be configured.

Gyro direction

  • Check the receiver  label/user manual to understand the referred LEDs' operation
  • Connect power and wait 1 second 
  • Hold the C button and wait for about 1 second until the 6 LEDs flash
  • Release the C button
  • Observe which red LED is flashing and brief press C to select the required mode
  • Press C to toggle between settings. On means selected. Exit automatically in 5 seconds.
  • Wait for 3 seconds and remove the bind plug.

V/I sensor calibration

  • Turn on the receiver and transmitter. The telemetry report page may optionally be checked during and after calibration.
  • Plug the V/I sensor. Make sure the required DC loading device such as a brushless motor with ESC as well as the current and voltage meter is connected. 
  • Press the F and B buttons together at the same time for 2 seconds but no greater than 5 seconds
  • Observe 3 green LED flashes. Ensure 8.4V is provided to the V/I sensor.
  • Press F or C button briefly
  • Observe 3 red LED flashes
  • Turn on the DC loading device by throttling the transmitter. Ensure 4A is drawing across the V/I sensor. Be careful with the motor spinning if it is to be used.
  • Press the B button to save and exit.

V/I probe calibration

  • Turn on the receiver and transmitter. The telemetry report page may optionally be checked during and after calibration.
  • Plug the V/I sensor. Make sure the required DC loading device such as a brushless motor with ESC as well as the current and voltage meter is connected. 
  • Press the F and B buttons together at the same time for 2 seconds but no greater than 5 seconds
  • Observe 3 green LED flashes. Ensure 8.4V is provided to the V/I sensor.
  • Press F or C button briefly
  • Observe 3 red LED flashes
  • Press the B button to save and exit.

Gain setting

- Adjust via the 3 dials or real-time master gain on channel 8 depending on the transmitter channel's availability.

View setting LEDs with all on

- Press the C button briefly (no more than 2 seconds).


: *
: *
: *
 

T-Style Nylon Control Horn

T-Style Nylon Control Horns 

High Quality 1" Aluminum servo arm from Spot-On RC

Spot On Servo Arms are made of high quality 7075-T6 aluminum, one of the highest strength alloys available for this purpose.  They feature an ultra secure double lock design, keeping your servo arm secure and eliminating any slop between the main servo gear and the arm.  Spot On Servo Arms are also sand blasted and anodized for a beautiful appearance.

Spot on offers their servo arms in many sizes, threads and gear output compatibility.  Spot On arms are offered in:
M3, or #4-40 holes, so you can use ball links that are metric or standard Futaba, Hitec or JR compatible gear mesh. Sizes ranging from 1” to 2” for single arms and 2.5” to 4.5” for rudder arms.

Available colors are Black or Silver

Spot On RC Servo Arms are measured from the center hole of the servo to the outermost hole (for example, a 1” arm is exactly 1” from hole center to hole center).  However the larger sizes offer the option of one or two more additional inner holes so you can use them for future projects or fine tune your ratios.

Redwing RC only offers the V2, upgraded version, with stronger aluminum and finer design.  No matter which Spot On RC Servo Arms you choose you will be sure to experience problem free set up and operation with these high quality servo arms.


rw-Control Horn

$2.99

Flight Model 91" VOTEC 322 60-80cc ARF

Flight Model 91" VOTEC 322 60-80cc ARF


FM-F191-Votec-91in

$789.00

6 CH AF Model C-47 (DC-3) Skytrain RC Warbird 1600mm (63") PNP

Pre-order sale $80 off! Estimated Arrival Early March

  • This is an EXTREMELY popular product and quantiities limited, so we STRONGLY recommend pre-ordering if you wish to receive one from the first shipment. 
  • Pre-order today to reserve your model at this special introductory price, They will sell out before they arrivew! Credit Card or other payment will be charged at the time of order.

6 CH AF Model C-47 (DC-3) Skytrain RC Warbird 1600mm (63") PNP

RedwingRC Plug-and-Play aircraft!

Now this is a unique plane for sure! Upgrade that asphalt runway of yours to a pond, lake or pool! The PBY Catalina seaplane is something you have to experience! It took months of flight testing and designing to produce this amazing aircraft. The Catalina is capable of stable flight at really slow speeds making it perfect for any skill level. Get ready for some really neat details and a large 55 inch wingspan! The Catalina is blast to fly and and landing on on water is a piece of cake.

Key Features:

  • Powerful twin 480 size (1100kv) outrunner brushless power system w/ 3-bladed props
  • Twin 30A Brushless ESC with Switch-Mode BEC
  • Durable and lightweight EPO construction with many surface details
  • Excellent Flight Performance
  • Detailed Body Structure
  • Suitable for Both Intermediate and Experienced Pilots.
  • Removable / detachable wing. (4 screws)


Specifications:

Wingspan: 58 inches / 1470mm
Overall Length: 37 inches / 940mm
Flying Weight: 45oz  / 1275 w/Battery
Motor Size: Twin 480 size (2814-1100kv) outrunner brushless motors (installed)
Propeller: 2 x 3 blade props 8 x 6 x 3
Radio / Transmitter 4 Channel (NOT INCLUDED)
Receiver +4 Channel (NOT INCLUDED)
Servos: 4 servos installed ( 2 x 9g - 2 x 17g)
Speed Control : 1 x Dectrum 30A Brushless with Switch-Mode BEC (installed)
Battery: 11.1V 2200 mah (not included)
Charger: 3S+ (11.8v) Lipo Charger (NOT INCLUDED)
Flight Times

Average (8-12 mins)

Assembly Time

Approx 45min


AF-006-C47

$299.99